DG(Dol Guldur) 3인던 3개 6인던 한개 공략정보 (영문)
페이지 정보
작성자 아노스이실 쪽지보내기 메일보내기 자기소개 아이디로 검색 전체게시물관련링크
본문
Sword Halls (3-man)
See also Sword Halls
Arena style instance with 3 bosses: Sorcerer (left door) - Summons fire. Keep moving to avoid or drop a Captain Banner. Morroval (right door) - Summons bats and heals (interrupts!). Olog Hai (middle door) - AOE dps, and does a huge aoe knockback (avoidable, stay in the blood stain left of the entrance). All three bosses have corruptions that give them +15% incoming damage (meaning you do more damage to them), that when removed, provide buffs to the group. The Sorcerer gives a heal, the morroval gives a power heal, and the olog hai gives a bonus to your damage mitigation. If you're at a tough part of the fight, it's best to removal the corruptions. If you're at an easy part, keep them on to speed up killing.
Easy Mode Guide
Easy mode is just that, easy. You fight useless adds (2 pulls before each boss, each with 3 mobs, they drop the quest items), and one boss at a time (Sorcerer -> Morroval -> Olog Hai).
REWARD - 3 Medallions of Dul Guldur and 3 Chests full of runes and relics
Hard Mode Guide
In Hard Mode (or Challenge Mode) you must defeat all 3 bosses at once (adds spawn after about 10 minutes, meaning you need to finish before then). The key to this is a good group combination. Healer, Tank, DPS is the best combo. The tank can tank two of the mobs (Olog Hai, and one other), as the DPS kills the remaining one (group make up dictates which you kill first). With a champ, guardian and minstrel, it was easier to kill the morroval first, so I could stop it from healing, and keep the bats of the mini. With champ, captain and minstrel killing the sorcerer first was easier since it's fire is the most annoying, and it has the lowest hp. It should be noted that the morroval MUST be interrupted, or kept on the opposite side of the room from the boss being dps'ed.
For those that really excel at their class having the Guard/Champ/Warden tanking all three mobs is very doable. Using the corruptions early on to help off-set the damage the tank will take helps tremendously.
REWARD - 4 Medallions of Dul Guldur (+3 from daily quest) and 1 Chest full of runes and relics
Warg Pens (3-man)
See also Warg Pens
A straightforward instance. Most of the instance is trash pulls, with 2 bosses. The first is a simple tank and spank with adds. Aoe dps helps here. The 2nd boss is a bit more intensive. He hits extremely hard, and the healer will be strained to keep up someone who is not a tank (moreso if you're doing hard mode).
Easy Mode Guide
Not to Eat. Simple. Kill everything, don't worry about wargs eating meat (actually, stunning them as they run to eat meat, would speed things up).
REWARD - (3-4?) Medallions of Dul Guldur
Hard Mode Guide
To Eat. This is a bit more challenging. Every lump of meat sitting around on the ground must be consumed in order to complete hard mode. Wargs eat meat at around 1000 hp, so don't dps them further than that, and give them time to eat. The only real challenge here is the final boss. Have your tank hold the boss, the healer keeps everyone up, and your dps makes sure all five pieces of meat are consumed. This can be a pain, specifically if a warg does not want to eat.
Tanking the final boss in hard mode
Walk into the final boss's room. Stop, look just ahead and to your right and notice that really wide pillar. If you attemp to kite the boss, you're going to get hounding fear and he's going to catch you and rip you a new one if you aren't prepared. So, use the pillar. Start running around one way, then turn to look at him on the other side. As you run around, since you're faster than he is (unless you have hounding fear), you'll eventually start to lap him (catch up to him). When this happens, he's going to turn and start coming ta you the other way. Eventually, you'll find an equilibrium point, where you're both sort of shimmying back and forth around the pole.
Stay out of the fire -- going near it will remove the boss's frost DoT, but it'll also burn you, so use it judiciously. Use a pot on the poison DoT (or, if a hunter is your DPSer, have him remove poison from you). If you get a wound, use a wound pot (or, if you have a lore-master or rune-keeper, have him remove/prevent the wound).
REWARD - 6 Medallions of Dul Guldur (+3 from daily quest)
Dungeons of DG (3-man)
See also Dungeons of Dol Guldur
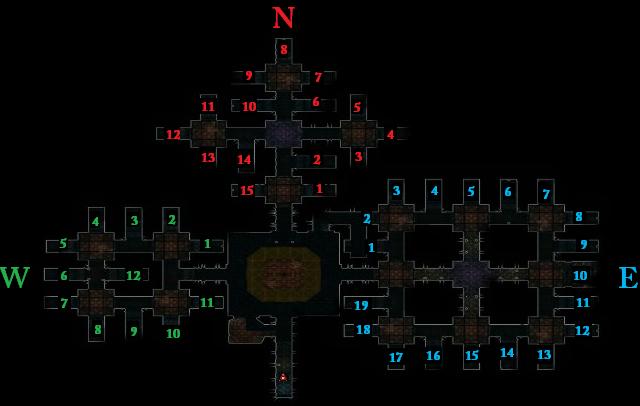
The Dungeons instance is both a puzzle instance and a combat instance. The dungeon is divided into 3 wings (West, North and East). In each wing, there are prisoners to be rescued (West - 2, North - 3, East - 4). Your goal is to rescue prisoners from each wing. The more prisoners you rescue, the better your reward.
Two dynamics make this challenging. The first is the fact that once one prisoner exits the wing, the doors to that wing begin to close and after about 90 seconds, they slam shut, and you're locked out from that wing. The second is the pathing Olog-Hai that cannot be targeted or attacked. If you get too close to them, you will be 'captured' and thrown into a jail cell at the beginning of the instance. The door takes about a minute to open (long induction) and all of the Guldur Guards will respawn, so you want to avoid this (Note: if you are captured 3 times, the wing is sealed, no matter whether you rescue prisoners or not). The Olog-Hai can be put to sleep for a limited amount of time using Nightshade Barrels (from the book 9 version of this dungeon, if you've done that). If the Olog-Hai finds a prisoner, it will throw you in jail, and the prisoner will be sent to a new cell and must be searched for again.
The basic strategy is that you should move between empty prisoner cells to avoid the Olog-Hai. Rooms with elves that must be freed should be avoided until you're ready to free all at once. Nightshade Barrels can be used to put the Olog-Hai to sleep, and this is good in some cases, but bad in others (as it can mess up timing, making it harder to get all the Olog-Hai asleep at once).
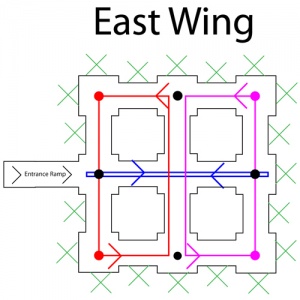
When Prisoners escape, they will run only when one of your group is around, and will take the straightest path (always around the edge though, never through the middle, ie East Wing).
Rewards
0-2 Prisoners Rescued - 1 Medallion of Dul Guldur and one chest of runes/relics.
3-6 Prisoners Rescued - 6 Medallions of Dul Guldur and one chest of runes/relics.
7-9 Prisoners Rescued - 8 Medallions of Dul Guldur and one chest of runes/relics.
Note - I'm unsure what the lower bound on the normal mode and upper bound on the easy mode rewards are.
West Wing
Prisoners = 2 :: Olog-Hai = 1
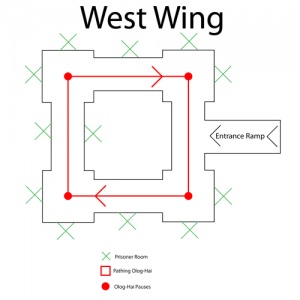
The West wing is the easy wing. The one Olog-Hai moves in a clockwise square around the wing. He stops in the corners. Start on the two sides closest to the door, and work your way to the back. Avoid the Guldur guard pulls if you find the prisoners in early rooms (simply to save time).
North Wing
Prisoners = 3 :: Olog-Hai = 2
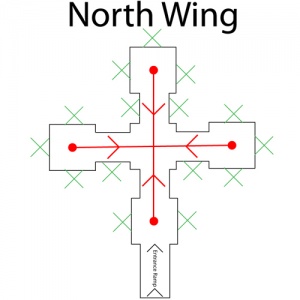
A straightforward wing. Two Olog-Hai make a cross and path back and forth. Once you've cleared the trash mobs, it's best to place a barrel in the center point, putting both to sleep, and therefore not requiring more than 1 barrel to have the whole area open to you. Remember to use the empty prisoner rooms as safe zones from the Olog-Hai. The rooms close the center (if empty of prisoners) are perfect for placing barrels in the center and putting the Olog-Hai to sleep.
East Wing
Prisoners = 4 :: Olog-Hai = 3
NOTE: DO NOT USE NIGHTSHADE ANYWHERE BUT THE CENTER POINT!! Doing so will mess up the Olog-Hai's pathing times, and making putting all 3 to sleep a much much bigger hassle than it should be.
This is the difficult wing. There are 4 prisoners spread out in one of 19 rooms. There are around 15 Guldur Guards around this wing, and having them respawn will set you back on time in a major way. The only way to handle this wing is to clear the entire area of guards (opening rooms looking for elves along the way - make a map of locations for later: It Helps!).
Once you've got everything cleared, use your map to help determine where you need people to begin getting prisoners. You should always start on the east wall (as those take the longest, and you can get others on the way). If there is a prisoner in the center room on the east wall, it should be noted that he will run counterclockwise(or has for me twice).
Barrel Placement and Elf Rescue Explanation: I like to put my group members at the center points of the north and south wall so they can help me monitor the two Olog-Hai that make circles. I will stand at the entrance watching the Olog-Hai that goes down the center. When he is at the far wall, and the other two are just at the rooms on the far north and south (in the center), the barrel should be placed in the center. At this time your two other group members go get prisoners (starting on the eastern wall and working clockwise in the south, and counterclockwise in the north). If your timing is good, you can get all 4 within a few seconds of each other, no problem.
Boss: The Warden
Once you've freed a prisoner or more from each wing, and all the wings have been sealed, the warden will come down into the center room. During his fight, he will target the elven prisoners with an attack that will one shot them. The key to preventing their deaths is the new distributed damage system. Once they are targeted, you must have all the elves gather around the person being targeted. All the prisoners will share the damage of the attack, and you wont lose a prisoner (your healer will need to spend some time topping all the npcs off). Since some of the prisoners are ranged or healer types, it's best to use the layout of the room to help bring all of the elves in to one tight space to avoid the distributed damage hitting one of the archers that is far away and killing him. The pillars in the room work great for this. The rest of the fight is a dps race. The longer he stays up, the more distributed damage he does, the more prisoners you will lose.
Additional Strategy: An alternate strategy that seems to have good results is using the jail cell (near the entrance) to bring the boss and all the npcs into one tight area (thereby reducing the damage taken for his distributed damage attack). To do this, you must use the lever right as the fight starts, and pull him into the cell (he can walk through the door)), then have your dps spend the 1 minute induction opening the door a 2nd time to let in any straggling elves (although at least some elves can also walk through the door). Have your tank put the boss in the corner, and use the layout of the room to your advantage, having your healer LOS when he attempts to fear the players (allowing the healer to continue healing elves).
Sammath Gul (6-man)
See also Sammath Gul
The 6-man instance in the Dol Guldur instance cluster. This instance is one of the only 2 places in the world where a Symbol of Celebrimbor drops, which is required to craft level 65 2nd ages. Group make up is important. Due to the dynamics of the bosses and trash pulls, I would highly advise having diverse group. Having only 4 different classes for a run really seems to slow groups down and made trash pulls more difficult.
Trash Pulls
Here is a list of the different mobs you will encounter and their specific tricks. Tips to beating them also included (at no extra cost).
BEWARE BONE PILES!!
The randomly scattered bone piles MUST be avoided. If approached, they will spawn nemesis ghosts that take a few minutes to burn down (the ghosts continually summon skeletons until at least three skeletons are present, at which point they stop summoning until they have less than three skeletons this is interruptable, though the induction time is short). They slow down group advancement tremendously. Just leave them alone. Beware sharp corners, and tops of stairs. If no one in your group has done the instance, send out one person to scout moving their camera often to avoid these things. Spending 2-3 minutes extra avoiding these things is easier than spending 5 minutes fighting just one ghost.
Brutes
If you've been in the Treasury or done Blagh and Rung from DN, these guys absorb all the damage being taken by those around them, while taking very little or no direct damage done to them. The key is to focus dps on the add(s) to kill the brute as quickly as possible, then just kill the adds. A Champion really helps when there is more than 1 add, as a champion does "double" damage to the brute with aoes to the adds. A guardian or captain really helps here as well to keep all the aggro off the minstrel. Damage aggro does not help here, since the damage is transferred. (Also, remove corruptions if they are present. This helps as well.)
Sorcerers
Their only special attack is a stun that cannot be interrupted. It's a minor inconvenience really.
Loremasters
They do an induction knockback. It's very important that this be interrupted (due to something further down the list). Have your champion or burglar focus on dpsing the Loremaster first, for this reason.
Summoners
These guys do an uninterruptable summon. The only way to prevent the summon is to mez, stun, fear or start a conjunction on them. Champions, Burglars and Loremasters are very helpful here.
Boss One: Urchir
A fire based unseen or undead. He does frontal aoes with his default melee attack (so stay behind him if you're not the main tank). This guy is easily fervour tanked. He has 2 problematic attacks. The first is "Will you bring doom to your friends, [playername]?". This puts a green eye above the affected character's name. If you get this, run around the alter (around, the top is on fire, don't run through it). The second is "Can you handle the burn, [playername]?". With this, he will launch a distributed damage attack on that player. If alone, that person will die. It's best to have everyone group up around the boss on that (instead of everyone trying to find the person he called out). At 60k hp, he starts setting part of the room on fire. STAY OUT OF THE FIRE! At this point, it's a dps race, and the group should move to stay out of the ever-spreading fire.
Reward - 1 DG Medallion
Boss Two: Alagossir
A lightning based unseen or undead. Same as the first boss, frontal aoes. He also has a knockback, so stay over 90 degrees from line perpendicular to him and the edge (more simply: stay away from the edge). He does wipe aggro, but with a good tank, it's no problem to keep him off the healers. If you get too far away from him, he will say something about straying too far, if you don't move in closer, he will hit you with a huge damage attack. For phase 1, it's best for everyone to stay close to him. Also of note, is the light adds. They will root you, and give you a higher miss chance. AOE them down for best results.
At 98.8k (half his hp), he switches to phase two. During phase two, he calls forth lightning that blasts the area. Each blast does about 1700 damage in an aoe. Everyone should run to the right wall close to him (but not behind him), and hug that wall. Range dps takes over. Melees can learn the pattern for the lightning and go dps, but the area around the boss is blasted with up to 5 lightning bolts at once (killing nearly anyone up there). During all of this, Guldor Lights will be hovering around, a few aoes will take care of them. I haven't seen them do anything special. Overall, a very straightforward fight. Probably the easiest in the instance.
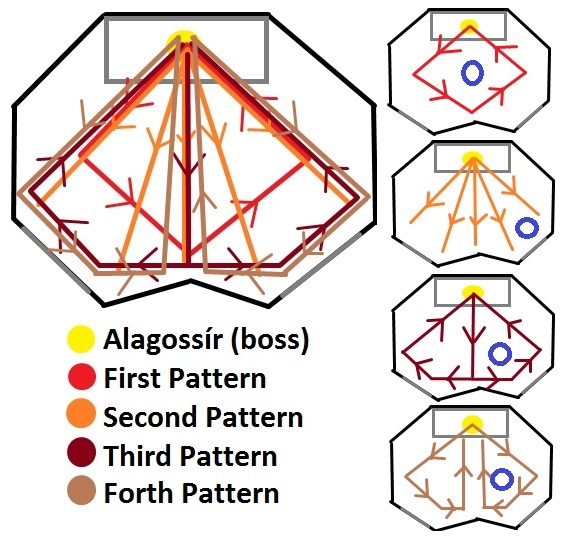
If your group is interested in speeding up phase two of this fight, the pattern that the lightning follows is very simple, and follows a set cycle (divided into 4 phases). (And thanks to Grampsaz for putting this list together! My edits were slightly clearer names, and shortening to save space.) There is a brief time to melee Alagossir immediately after the four-set cycle ends and during the first diamond set. However, the fan set will begin with multiple blasts of lightning right in front of Alagossir. You have slightly more than enough time to trigger a full fellowship maneuver, then everyone should retreat to the blue-circled areas on the map.
'Diamond' - One blast of lightning will slowly circle the entire room. It will start behind him and to the left and follow the outer wall counter clockwise.
'Fan' - Five blasts of lighting will start at the boss, working their way to the back of the room, spreading from each other more and more as they make their way to the back of the room.
'Two Circles' - Two blasts of lightning will start on the boss, running straight down the middle of the room towards the back wall. At that wall, they split and each one will follow the outer wall back towards the boss.
'Two Circles Reversed' - The opposite of the previous pattern. The two blasts start at the boss working around the room, and then up the center back to the boss.
Reward - 2 DG Medallions
Boss Three: Gorothul
A sorcerer of Mordor (check out Sauron making his second appearance in lotro!). This fight is a mayhem. The boss needs to be tanked, and interrupted. When ghost sorcerers and loremasters spawn, they must be mezed (they despawn after 30-40 seconds)(loremasters should be first target for mez). The boss does knockbacks which can be interrupted by clobber, addle, etc. The boss also does a fear attack, which will move your character at random for 8-10 seconds (don't be alarmed, just get back to the fight when it wears off). A burg for conjunctions or a captain for oathbreakers, buffs and extra healing is almost a necessity here. A ministrel on a champ tank was nearly impossible. This fight has the hard mode. Please read BOTH descriptions, as you may not want to do hard mode. There are bone piles around the room, but these are not activated when you step on them (see below).
Hard Mode Guide
For hard mode, you must NOT kill any of the Fell Spirits that he spawns. This is not hard. They have 4-5k morale, and are difficult to kill with aoe's accidentally since he absorbs them after they've been out for a bit. The catch is, each time a fell spirit despawns, a bone pile is activated. The room will rapidly begin to fill up with skeletons, so you will need AoE's and aggro skills to keep the skeletons off of the healers and you will have to kill the boss before there become too many skeletons to manage.
The rewards for Hard Mode are that you can advance to boss 4, and you earn additional DG medallions (3 from the quest, and 2 more from the 4th boss).
Rewards - Access to boss 4, 2 Medallion of Dol Guldur, and 3 Medallions of Dol Guldor from the daily quest.
Easy Mode Guide
For easy mode, you MUST KILL at least ONE of the fell spirits that Gorothul spawns. Once one dies, the door to the fourth boss locks, and you'll fail hard mode. If you kill all the ancient fell spirits before they despawn, none of the bone piles will activate. A good strategy is to leave one person tanking and interrupting the boss while any adds are out. Everyone else can kill the adds as soon as they spawn. Also, in this phase of the fight you can kill any lore-masters or sorcerers that are left and they will not respawn.
Rewards - 2 Medallions of Dol Guldor and a much much better chance of getting a Symbol of Celebrimbor (the token required for 2nd age crafting). This is based off a limited number of runs, and has not been 'proven' yet.
Boss Four: Demafaer (Hard Mode Only)
This is probably the most fun boss in the instance. The room is divided into 4 quarters, and everyone should be within melee range of the boss. He is immune to damage unless there is a skeleton near him. Fell spirits in two of the corners can be used to keep a constant supply of skeletons on the group. The cool part is that he sets 1/4th of the room on fire to start. The group must move as a unit and stay ahead of the fire (best to stay behind it, actually). After about half his health is down, he sets another 1/4th of the room on fire, so half the room is on fire. It's best to target mark someone that can keep an eye on the fire, and everyone just stays with him.
Rewards - 2 Medallions of DG, +3 for the daily quest, and a good chance at a decent teal piece of jewelry (a +70 vitality ring, for example).
머크우드가 패치 되면서 새로 생긴 3인던 3개와 6이던 한개 그리고 여기엔 없지만 12인 레이드인 Barad Guldur는 전부 Dol Guldur에 모여 있다네요~
 |
| 로그인 후 댓글을 남겨주세요. |


 호빗
호빗 드워프
드워프 엘프
엘프 인간
인간


